Friday, February 27, 2015

Safari Quilt I

 A couple of weeks ago, I took a workshop with Thomas Knauer when he visited Ninigret Quilters. We learned so much about design that will translate to all future quilts. The workshop was called "Quilting with Code" and we were asked to select a word or phrase to translate. I chose SAFARI, the Swahili word for journey. I had envisioned making a mini quilt to commemorate Julia's Journey to Tanazania using the fabrics she brought back.

Here is her mini. It finished at 16" square. It was actually done on February 12, but I couldn't blog about it until she saw it.


 Braille uses a 2 X 3 grid. I blocked it off for you below so you can see the letters. The African prints represent dots, and the solid squares are not dots.


I wanted to quilt a path through the quilt as another reference to the journey. It could be a river, but Julia says it looks just like a cattle path. I quilted lots of pebbles and a few tufts of grass with a variegated gray Aurifil. Grass was the subject of her research project in the Ngorongoro Crater.


I used some linen blend on the front and back for the added texture. It was not the best choice for the binding. It's a little bulky in the corners. Some leftover squares became hanging pockets and the label on the back.
 

This mini was plan A in my mind, but not the quilt I worked on in class. When I told Thomas the story behind my chosen word, he thought Julia would need to wrap herself in it. So, I set about designing a large lap quilt. The fabric she brought home was a random selection, so it was tricky to bring it together. In this piece, safari is coded across the top and down the left side, then the letters rotate through. 

Top Row: s-a-f-a-r-i
2nd row: a-f-a-r-i-s
3rd row: f-a-r-i-s-a
etc...


Neighboring squares are sometimes combined into rectangles, a technique Thomas refers to as enjambment (a poetry term). Again, the African prints are dots, and the solids are not dots. It's a cool piece, but it's not speaking to us. We love the meaning behind it, but we don't love the piece. I even had a quilting plan in mind, with a spiral radiating out from the bright turquoise square (Julia's favorite color). In between the parallel lines of the spiral, I would quilt the places she's been. More could be added as she continues to travel.

When Julia came home and we talked about it more, we decided to use the large coded piece as the back of the next safari project using The Tartan Kiwi patterns. Now that is a plan we both love!

http://seaside-stitches.blogspot.com/2015/02/wip-wednesday_25.html

Wednesday, February 25, 2015

WIP Wednesday

 I started a new project and it is going to be awesome! I volunteered to be a pattern tester for Juliet at The Tartan Kiwi. She sent me a copy of her latest design for this handsome lion. Julia and I had fun choosing fabric, and we decided to go scrappy with his mane.


 I started cutting a little after 8am and finished the last seam at about 6pm. It's a big 24" block. This is not a beginner pattern. He's a lot of work, but well worth it! Look at those eyes! When I'm done with this post, I'm going over to The Tartan Kiwi to buy all of her safari animal patterns.


He reminds me of this Tanzanian boy!


In other WIP news...

I finished my Hawaiian applique pillow that has been waiting patiently for 6 months.


When I went looking for the next WIP to work on, I chose this stripey project. Read more about it here.

I also found the fabric for my new pajama bottoms that I bought over a year ago. The pattern has been cut out and they are ready to stitch together. It shouldn't take long, but I'm not good with apparel so I'm stalling. Maybe today?


I thought it was cool that Julia and I were using the same colors this week. I was cutting strips for a retreat project, and she was painting a birthday gift for her boyfriend. Coincidentally, the pattern I'll be working on is called Sunset.

And there was more snow overnight. Because we don't have enough?

Linking up...
http://www.freshlypieced.com/

Sunday, February 22, 2015

Fun Stripes

 In an attempt to clean out some WIPs, I took out this stripey project that I started in August 2013. I made 4 blocks back then, and set it aside. Every time I look at my stripe stash, I think about this project. The time finally came to bust some stash!


The technique by Anita Grossman Solomon makes matching all those stripes super easy. You already know that I think she is a genius. This is more proof of that! With four identical striped squares, you make this large block with 2 X-centric and 2 concentric units. Please purchase her book Rotary Cutting Revolution for full instructions.
 

I had so much fun collecting interesting striped fabrics.
 

 Look at those perfect centers!


Some fabrics don't produce 4 identical squares from 1/4 yard. In this case below, I was able to cut 2 pairs of matching strips. The effect is still interesting.
 

The top now measures about 56" X 70" which is a nice lap size.


Add another to the to-be-quilted pile! I've got a little tendonitis in my wrist from all this quilting, so I might need to cut back a little. Finishes will not be coming as quickly in the coming weeks!

Thursday, February 19, 2015

Orchid Pillow

 You guys, another WIP is done. I know it's getting a little ridiculous. I need to ride this wave of productivity as long as it lasts!

Here is my Orchid Pillow before stuffing. It started in a Hawaiian applique class with Janet Elia last August. Janet provided a simpler pattern than this, but Bill bought me this one on a work trip to Hawaii over 20 years ago. The applique was actually finished soon after the class.


 I needed a handwork project for last night's TV watching, so I took this out. I had to go find the purple thread that I had been using. Why did I put it away? I rinsed out the blue pen before I went to bed and it was dry by morning. I love the texture of hand quilting. I really need to do more of it.


I pulled fabrics this morning for the backing and binding. The first time I saw binding on a pillow, I thought it was kind of odd. Now I love it! It gives the look of cording, but it's way easier. The striped binding adds lots of color and brings in the greens and blues of my bedroom.


Man, I love this backing print. I only had about a 10" strip left, so I had to piece it across the middle. That's where I left an opening for stuffing the pillow. I added some fusible batting to the backing so the stuffing wouldn't look lumpy.
 

 The orchid design is a nod to the Pantone color of the year for 2014, Radiant Orchid.


We have so much snow and another storm coming this weekend. I'm staying cozy inside with my quilts!


Orchid Pillow
18" square
Started August 13, 2014
Completed February 19, 2015

Wednesday, February 18, 2015

WIP Wednesday

 Oh, my goodness. I finished a boat load of stuff this past week. I blame the snow! 

This morning, I finished the binding on The Cool Side of the Rainbow.


Yesterday, I sewed the button on my Marine Mom tote.
 

Monday, I quilted and bound the Selvage Log Cabin.
 

I needed a break, so I crocheted this adorable blue elephant on Sunday night.


 On Saturday, I made myself a tray table ironing board.


I finished the Friendship Star on Thursday night. I've been enjoying hand stitching bindings at night while I watch TV.
 

I also finished a secret little project on Thursday. (Come back on Friday for the reveal.)
 

In progress: 

I made 48 string blocks to use as "thread" in an upcoming spools workshop.


I've made a few more Wild & Goosey blocks as leaders/enders. This one might become the primary piecing project soon.


I went to a workshop with Thomas Knauer last Wednesday which was awesome! I'm not ready to show that piece yet. It still needs some tweaking.


 I guess it's time to dig out some older WIPs. What will Tina finish next week?

http://www.freshlypieced.com/

Cool Side of the Rainbow

 Yes, another finished project! All this snow is making me super productive.

  
This little quilt started with improv blocks made from the cool- (not warm) colored modern scrap bin. I found the perfect pale yellow print for the border on sale at Joann's on Monday. I'm trying to not be such a fabric snob. I become more frugal at tax time!


Would you call these blocks improv, made fabric, or mile-a-minute? I guess it depends on how long you've been quilting. Whatever you call it, it works. I really did make a dent in this bin.
 

 Since I had this half-rainbow idea in my head, I quilted concentric quarter circles across the whole quilt. I "marked" one line with a hera marker and then just echoed that with the edge of my walking foot. I think you can see that I also moved the needle over to the right to make the spacing as wide as possible.


I used four colors of thread: turquoise, green, purple and yellow. I wanted to use a purple binding, but my stash is seriously lacking in purple. I think the stripe is fun and picks up all the colors. I bought the fabric for the back and the sleeve at Lorraine's yesterday. The green backing was only $2.99 a yard. Score! The owl print was just too cute to pass up. I could have used fabrics from my stash for the backing and sleeve, but these were too handy.
 

I do love the texture of parallel quilting lines. 


The Cool Side of the Rainbow
42" X 42"
Started February 8, 2015 (?)
Completed February 18, 2015

Marine Mom Tote

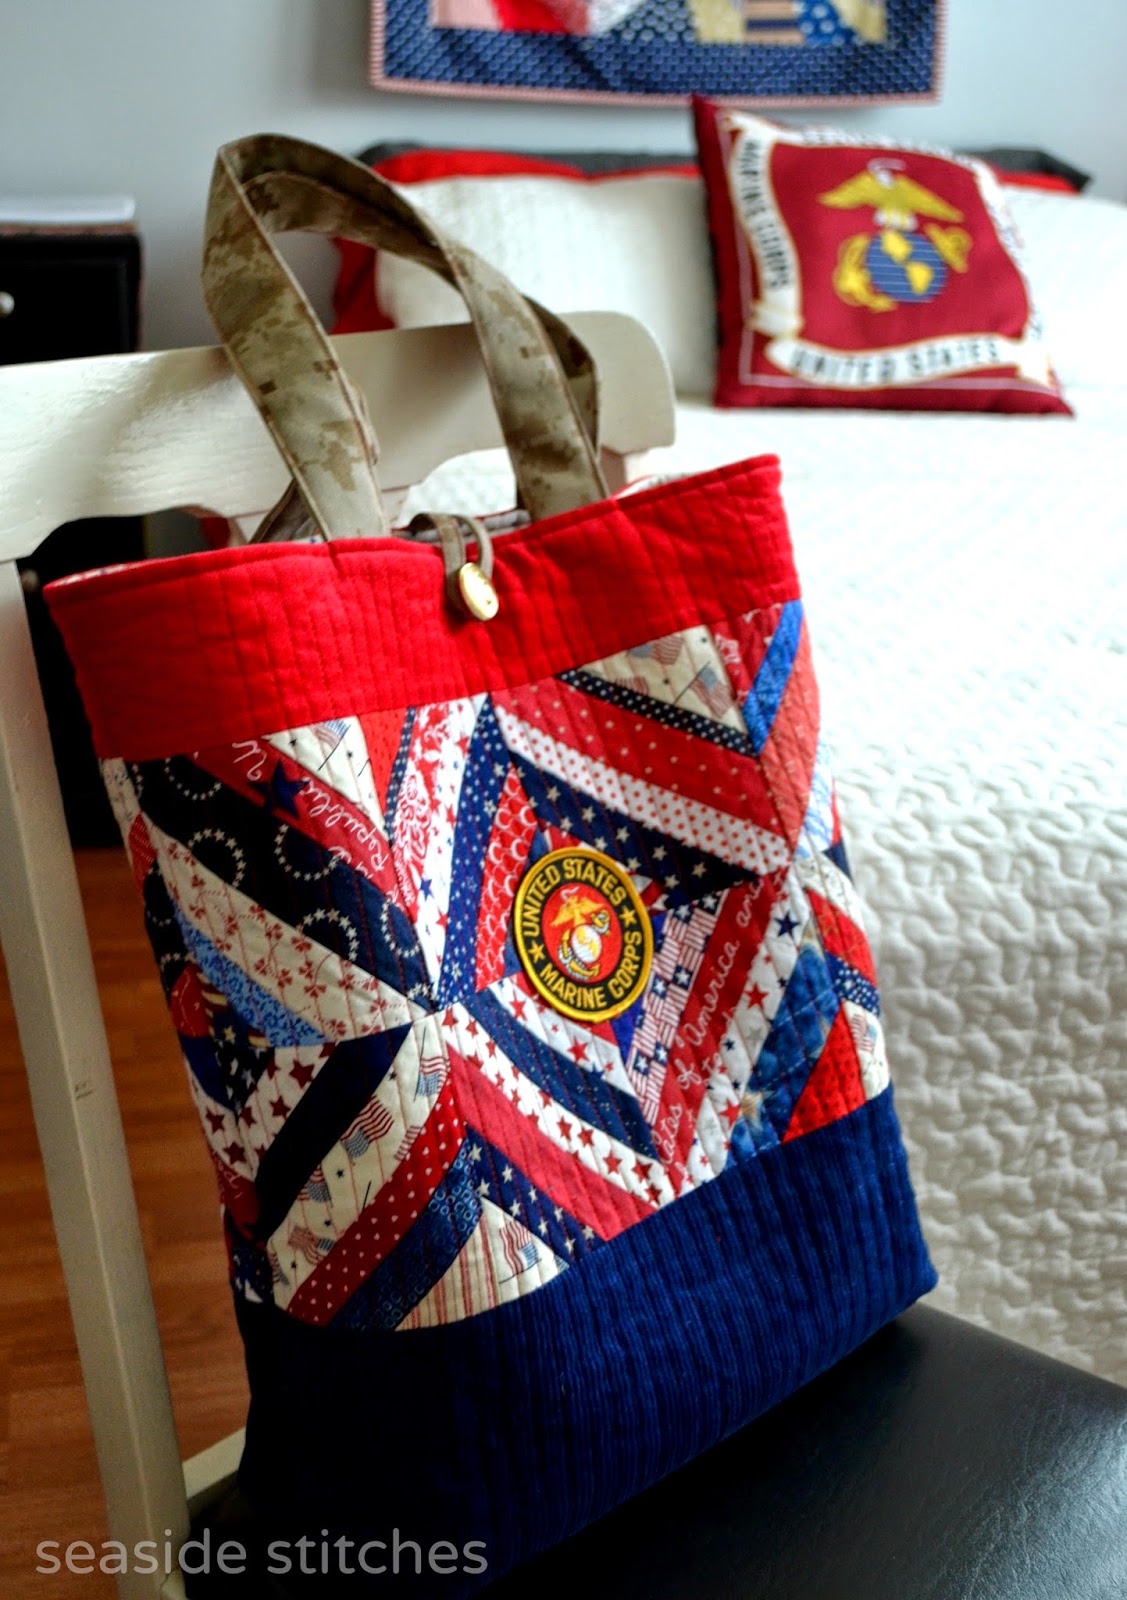
I finally made myself a proud mom tote bag. I mashed up two patterns: The Market Tote by Jodi Nelson of Pleasant Home and Oak Park Bag by Stephanie Dunphy. I used Jodi's idea of the string blocks and Stephanie's corduroy love. The blue corduroy on the bottom is a wide wale, and the red is narrow.


 I made the string blocks while Pete was in boot camp over a year ago. I was planning to make a tote to bring to graduation. Instead, I bought the patch at his graduation from Parris Island. I found the perfect button yesterday at Lorraine Fabrics in Pawtucket, RI.


I inserted a zipper pocket in the lining because the Kindred Quilters taught me how. Now every bag needs zippered pockets! The handles were cut from a worn out pair of Pete's pants. Gotta love desert MARPAT!
 

I am a very proud Marine Mom!

Tuesday, February 17, 2015

Selvage Log Cabin

 Here it is- the selvage quilt that didn't make a dent in my collection of selvages! This is my second selvage quilt (Emerald Selvage Spiderweb, 2013) and probably won't be my last. Now that I'm in the habit of saving them, I can't stop!


This is where I started a couple of weeks ago. If you are wondering, the red is Kona Tomato. (My grandfather grew the best tomatoes.)

It only took about a week to complete the top. Many thanks to Karen Griska for writing a great pattern! I opted to set the blocks on point and skipped the borders. I wanted to make lots of blocks (I cut mine at 10"). This size fits perfectly on my kitchen wall. Selvage quilts are heavy, so a lap quilt wasn't appealing to me.


I knew I wanted to quilt this with red and white thread. I started with "organic" vertical lines through the red squares. I figured whatever I quilted in white would disappear, so I decided to practice feathers. (I really stink at quilting feathers!) All that top to bottom quilting means no threads to bury. No marking, no threads to bury = win, win.


There are some really cute selvages in here. And so many memories of projects past! Printed copyright dates range from 1994 to 2014.

The back is loaded with dots. Why not?

The only place you can really see the feathers is on this section of the back. That's OK with me! More practice required.

One more glamor shot on the couch with the matching pillow. Yes, it's snowing again! 

Selvage Log Cabin
(needs a cuter name. any suggestions?)
42" X 42"
Started January 31, 2015
Completed February 16, 2015