Saturday, August 31, 2013

Just Keep Swimming

 I guess Saturday is pillow-making day! I finished Julia's Dory pillow this morning, so I could ship it to her today. She forgot to pack a few things for school, so she will be receiving a very large box in a few days.


Back in April(?) I paper pieced this Dory block from a pattern at Fandom in Stitches. I had to make some corrections to the eyes because the pattern was missing a couple of lines. I finally did the embroidery last week, hoping I could finish the pillow before she left for school. Didn't happen.
 

The only quilting I did was some wavy lines in the borders with variegated thread. I could feel that something was wrong with the first round of stitches, so I loosened the top tension and the rest looks great.
 

 Julia is settled back at school. She had to say good bye to Pete and we didn't even cry. She won't see him again until his graduation from boot camp in December. He leaves in two weeks. Gah!


Just keep swimming!

Saturday, August 24, 2013

Pebbled Sea Glass Pillow

 I finished my Sea Glass pillow this morning and I love it!


I broke open this spool of Magnifico that I have been hoarding. It was the perfect color to blend in with the low volume background and it has a lovely silky sheen.
 

 It took me about an hour to quilt the pebbles. I had decided to leave the sea glass squares unquilted so they would pop. Five minutes into quilting, I quilted through a blue square, and out came the seam ripper. I didn't make that mistake again!


I tried to shove an old trow pillow into the new cover, but it was too big. Out came the seam ripper again so I could remove a few handfuls of stuffing. 
 

The binding is a yummy new stripe that I decided to use on all the small pieces I plan to make for my bedroom- pillows, wall hanging, and table toppers.


The pebbles aren't perfect, but they produced the texture I was going for.
 

Sea Glass Pillow
Started 8/23/13
Completed 8/24/13
17" square

Friday, August 23, 2013

D9P Pillow

We bought a new mattress this week, which meant fresh linens. I went with a white matelasse spread so I can add color in pillows and throws. I'm loving the beachy colors of summer- sand and sea glass.

I started a pillow today from this tutorial at the Moda Bake Shop. It's a mini disappearing nine patch. I cut 2.5" squares from my low volume scraps and sea glass solids.


After chopping up the nine patches and assembling, I have a piece that is almost 18" square. I'm considering quilting pebbles in the low volume sandy background. I have to psych myself up for it!


I'm nursing the boy back to health following the extraction of his wisdom teeth. He'll be fine in a few days. Have a great weekend!

Wednesday, August 21, 2013

WIP Wednesday

 I was happy to make it back to my machine this week. I didn't finish anything, but I did start two new projects and picked up an old one.

With Anita Grossman Solomon in town, I made a pile of Anita's Arrowhead blocks. These won't all end up in the same quilt. That red and white block sticks out like a sore thumb.


When I'd had my fill of arrowheads, I started playing with stripes. I followed Anita's instructions for Xcentric and Concentric blocks.  (More about Anita in yesterday's post.)


I dug out an old WIP last weekend. I finished hand appliqueing the letters (V-Z), then assembled the top. I must have started this quilt about 10 years ago to have a hand work project for baseball games. Each letter is cut from a novelty print. A is for Alphabet, B is for Balls, C is for Crayons. I don't know what will become of this little quilt.
 

At the top of the to-do list, this nine patch top needs to be quilted for the Ninigret Quilters' show in October.
 

I might spend some time with Pete's quilt today and tomorrow while he is attending motorcycle riding class. He wants to get his motorcycle license before he ships out so he can buy a motorcycle as soon as possible. We figured that riding a motorcycle will be the least dangerous thing he'll have to do in the next few years. God, help me!


Spend some time today surfing the WIP Wednesday links. It's worth the trip!
WIP Wednesday at Freshly Pieced

Tuesday, August 20, 2013

Anita!

 I finally had the opportunity to meet my quilty idol, Anita Grossman Solomon. I'm sure I've mentioned more than a few times how much I love her books. And how I think she's a genius. She has a knack for seeing block construction in new ways.

At Aunt Carrie's, enjoying clam cakes, chowder, fish & chips, and key lime pie.

I was thrilled to spend two short days with Anita when she visited Ninigret Quilters last week. Julia couldn't wait to show Anita the Old Italian quilt she made for Fred. They were so cute together. Anita loved hearing Julia's Girl Scout camp stories over dinner.


I made a few Anita's Arrowhead blocks during the workshop on Wednesday, then went home and made more. And more. And more.  If you don't have the opportunity to take a class from Anita in person, I highly recommend her Craftsy class, Traditional Blocks Made Simple. As a bonus, you'll receive an e-book version of Rotary Cutting Revolution included with the class materials. No joke. It is revolutionary!


I needed a break after three days of arrowheads, so I busted out the striped stash.  


This is the result of just a few hours of work using Anita's technique for making Xcentric and Concentric blocks. Aren't they fun? I must make more!


Random fact: Bill and I both have sisters named Anita.
 
While I was sewing, Bill and Pete went on a canoeing adventure that started on this glassy pond. That was the easy bit. Off in the distance is the entrance to a small river that they hoped to paddle down, but it was blocked by many, many downed trees. They climbed over, snuck under, portaged around, and slowly worked their way downstream. Our 15-year old (now leaky) canoe is being retired.
 

Back to the machine. Will it be more arrowheads or more strips?

Tuesday, August 13, 2013

How to Sew on Scout Patches

As the mother of a Gold Award recipient and an Eagle Scout, I've sewn hundreds of patches on uniforms, blankets and tote bags.


In fact, I stitched 130 patches onto Pete's blanket last weekend. It was time to get the 2010 Jamboree patches out of that shoebox! This is what I learned...

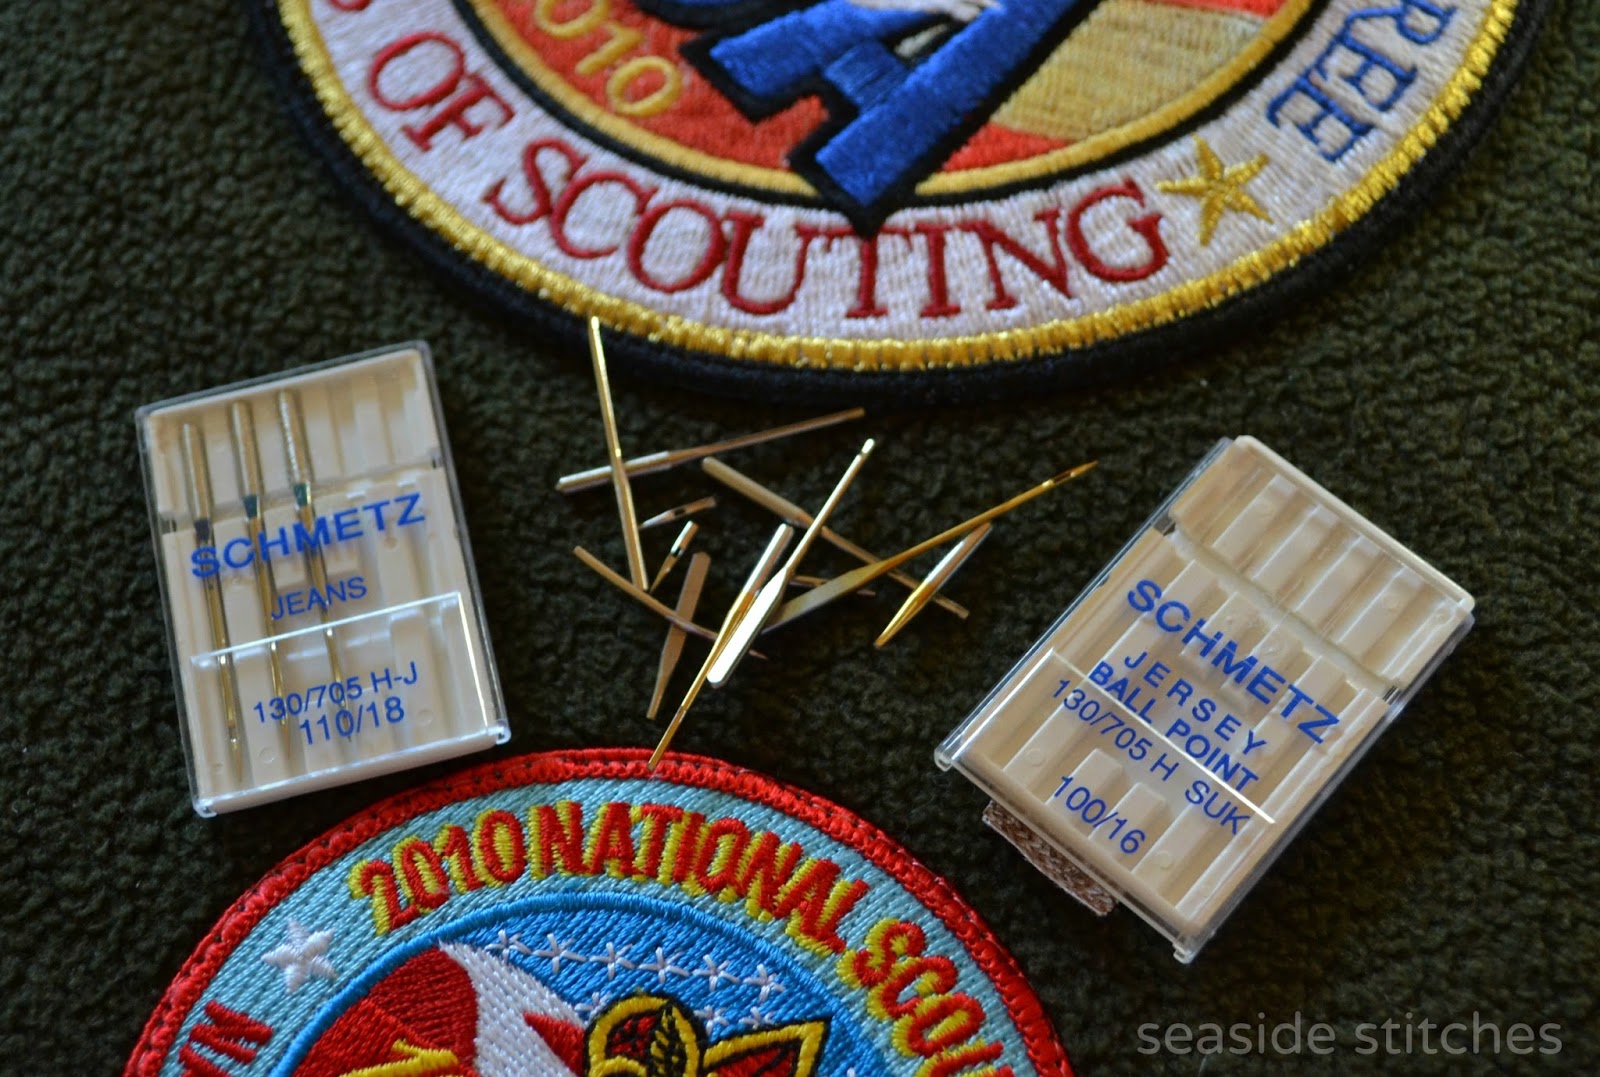
Any scout mom or grandma knows that most patches are backed with a plastic-like stabilizer that seals in all the embroidery threads. That is not fusible web! It is almost impossible to stitch through by hand, so I use my machine. (There are some new iron-on Girl Scout patches, but I've seen many of them fall off. Add some stitches to be safe.)

 I use a mono-filament invisible thread in the needle and a regular thread in the bobbin that matches the color of whatever I'm adding the patches to. You might need to loosen the top tension if you see too much of the bobbin thread coming up through to the front of the patch.

Choosing the right needle is a puzzle! I had Superior 90/14 topstitch needles on hand, but they were not strong enough. I liked the feel of the ballpoint needles on the fleece blanket, but again, the 100/16 needles snapped if I hit something they didn't like. I had the best luck with 110/18 jeans needles. I only broke one of those. It's a good idea to wear glasses or safety goggles to protect your eyes from flying broken needles!

Position the patches and use safety pins to hold them in place. If you can't get the pins through that awful plastic backing, tape them on, removing the tape as you go.

Drop your feed dogs and use your embroidery or free motion quilting presser foot. I bring the bobbin thread to the top so it doesn't make a knotted mess on the back. Start stitching, SLOWLY, around the patch. With the feed dogs dropped, you will need to move the patch/blanket under the needle. This way, you don't have to turn the whole blanket to get around the patch- think hula hoop motion. After you get all the way around, overlap the beginning about an inch before moving to the next patch. Lift the presser foot, slide the blanket over, and start the next patch. I trim all those connecting threads between patches later. If there are two patches abutting each other, you can just keep stitching.

Uniforms are a little easier. (That double layer of polar fleece was not my friend.) By free motion stitching, you can slide the sleeve onto the free arm of the machine and easily stitch around the patches.

In this closeup, you can see that I'm trying to stitch in that ditch where the satin stitching meets the patch fabric. That seems to be the point of least resistance.

I really try to avoid hand stitching, and I have been known to sew pockets shut by machine stitching pocket patches! In this case, I decided it would be nice to do it right, and hand stitched the Eagle Scout badge. That was a tiny pocket, because there is a pen slot on the left side, so it was hard to fit a hand in there to keep the pocket open. If you use something like a credit card or needle case inside the pocket, you can stick the needle in until it hits the plastic, and make your stitch without closing the pocket.

 This is what happens when your son earns a patch at camp and sews it onto his dirty shirt by himself! His friend made fun of him for sewing the pocket shut. Haha!

When you are done, use hair elastics (hair ties, pony tail holders) to keep your thread neatly on the spool. This must have been a Sew Many Ways tip, but I can't find it right now. We'll just give Karen credit for it anyway, because she's awesome!

I hope this helps some scout moms. Enjoy your time in scouting!

Monday, August 12, 2013

Winners!

 The winner of my 505 giveaway is comment #6, Vicki!


I'll be sending these goodies out to her soon.


 I haven't been around much this past week because of this guy. Pete's Eagle Scout Court of Honor was yesterday and there was a lot of prep work to do. It was a wonderful ceremony and he was so happy. He says he doesn't like to be the center of attention, but he definitely enjoyed himself. 


On to the next mountain to climb...

Wednesday, August 7, 2013

WIP Wednesday

As I wrapped up the Sew Every Day in July Challenge last week, I have two quilty finishes to report!

Star Crazy (Plan B) was gifted to a lovely couple on Friday night.


On Saturday, I used the leftover blocks and pieces to make Happy Stars for myself. I was thrilled that Aurifil and Alex Veronelli posted this little quilt on Facebook!


And a finish in a different medium... Yesterday I created a slideshow for Pete's Eagle Scout ceremony. My favorite photo from his scouting career is from the night of the Pinewood Derby district finals. In 2004, Pete's car won the pack race and advanced to the district race. Since it was a red car, we all dressed in red as his pit crew!


I'm having a giveaway! It's open until Monday, so do hop over and enter.


Then be sure to visit all the wonderful WIP Wednesday inspiration.

WIP Wednesday at Freshly Pieced

Monday, August 5, 2013

Five -o- Five

 It is time for a giveaway! I like round numbers, so I was excited to see my 300th blog follower recently. (Hi, Pat B!) As I type this, there are 303 on blogger and 202 on Bloglovin' for a total of 505 followers. I know there are duplicates in there, but the numbers make me happy!


I'm giving away this gathered clutch and felted wool crochet flower to one lucky reader. Just leave a comment and say hi! (If you think your email address won't show up for me, leave it in the comment so I can reach you.)
 

The clutch was made from Noodlehead's pattern. I love these little bags and use a bunch of them every day. They are great for corralling small things in a giant purse or tote. The flower is just for fun. It has a pin back, so you can use it anywhere.
 

 I'll choose a random winner on Monday morning, August 12. Good luck! 

Now if I could only figure out how to number my comments, I'd be in business. I've tried a couple of tutorials without luck. If you found one that worked for you, please share. Thanks!

Sunday, August 4, 2013

Happy Stars

 Since Star Crazy became a wedding gift, I used the leftover stars to make a little wall hanging for myself. I'm calling it Happy Stars, but that is subject to change if someone thinks of something better.


I did lots and lots of parallel quilting lines using Aurifil 50 wt in color #2326. It is a deep beige that blends beautifully with the batiks. I spray basted the layers together, and had some trouble with the sides bowing out as I quilted. That probably had more to do with quilting on the bias than with the spray. I steamed the heck out of it to straighten out the borders. It's better, but still not perfectly square.


I decided to hang it in the downstairs powder room/laundry room. It is replacing the easy overlay mini that I made in 2008. I still love it, but I am ready for a change.
 

It is hard to get the colors right in a room with no windows.


Happy Stars 
(Star Crazy Leftovers)
Blocks started in January 2010
Pieced and quilted on August 3, 2013
26.5" square-ish